Connect BigQuery
Authentication
JSON keyfile
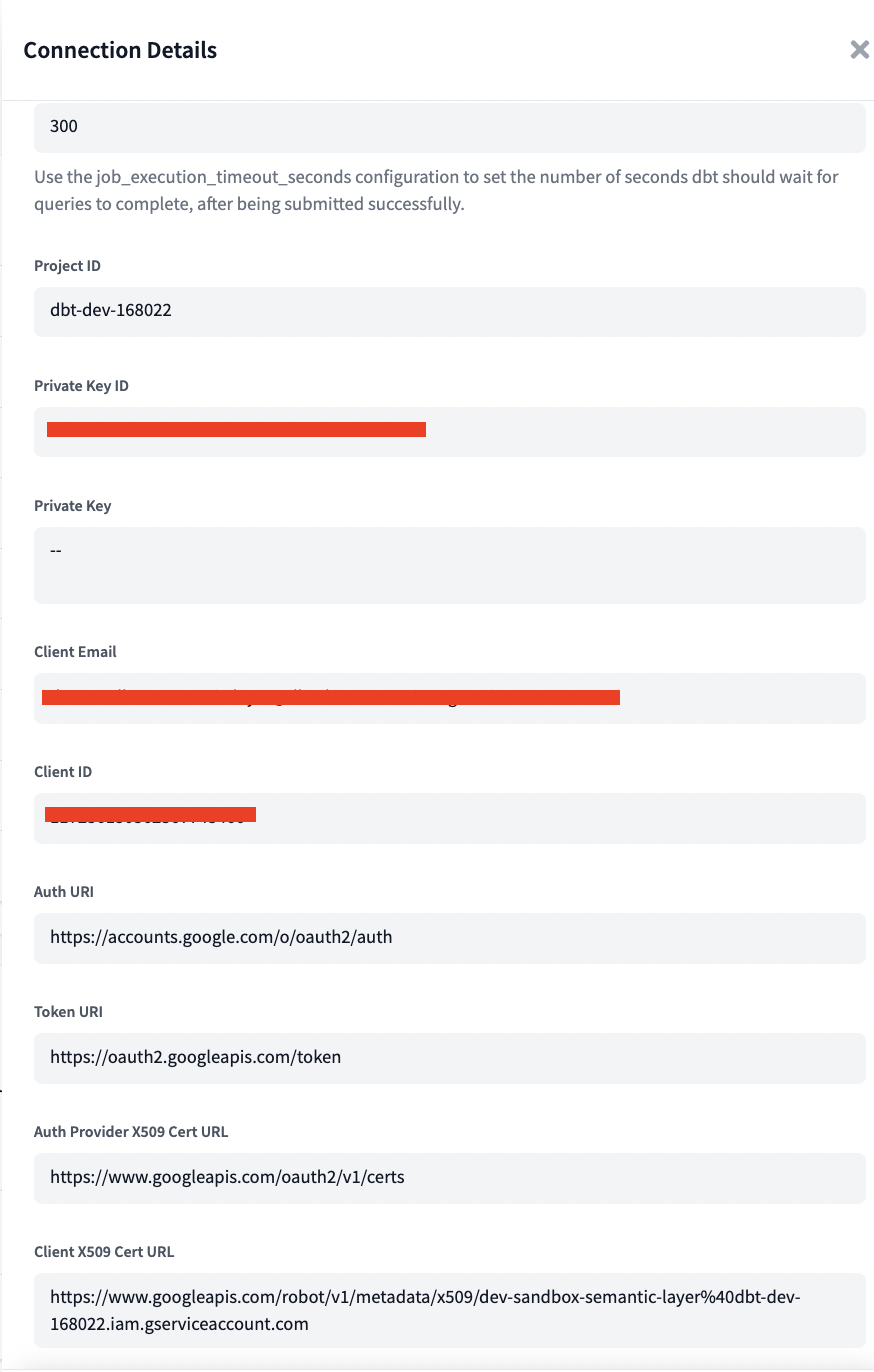
While the fields in a BigQuery connection can be specified manually, we recommend uploading a service account JSON keyfile to quickly and accurately configure a connection to BigQuery.
Uploading a JSON keyfile should populate the following fields:
- Project id
- Private key id
- Private key
- Client email
- Client id
- Auth uri
- Token uri
- Auth provider x509 cert url
- Client x509 cert url
In addition to these fields, there are two other optional fields that can be configured in a BigQuery connection:
| Field | Description | Examples |
|---|---|---|
| Timeout | Deprecated; exists for backwards compatibility with older versions of dbt and will be removed in the future. | 300 |
| Location | The location where dbt should create datasets. | US, EU |
BigQuery OAuth
Available in: Development environments, Enterprise plans only
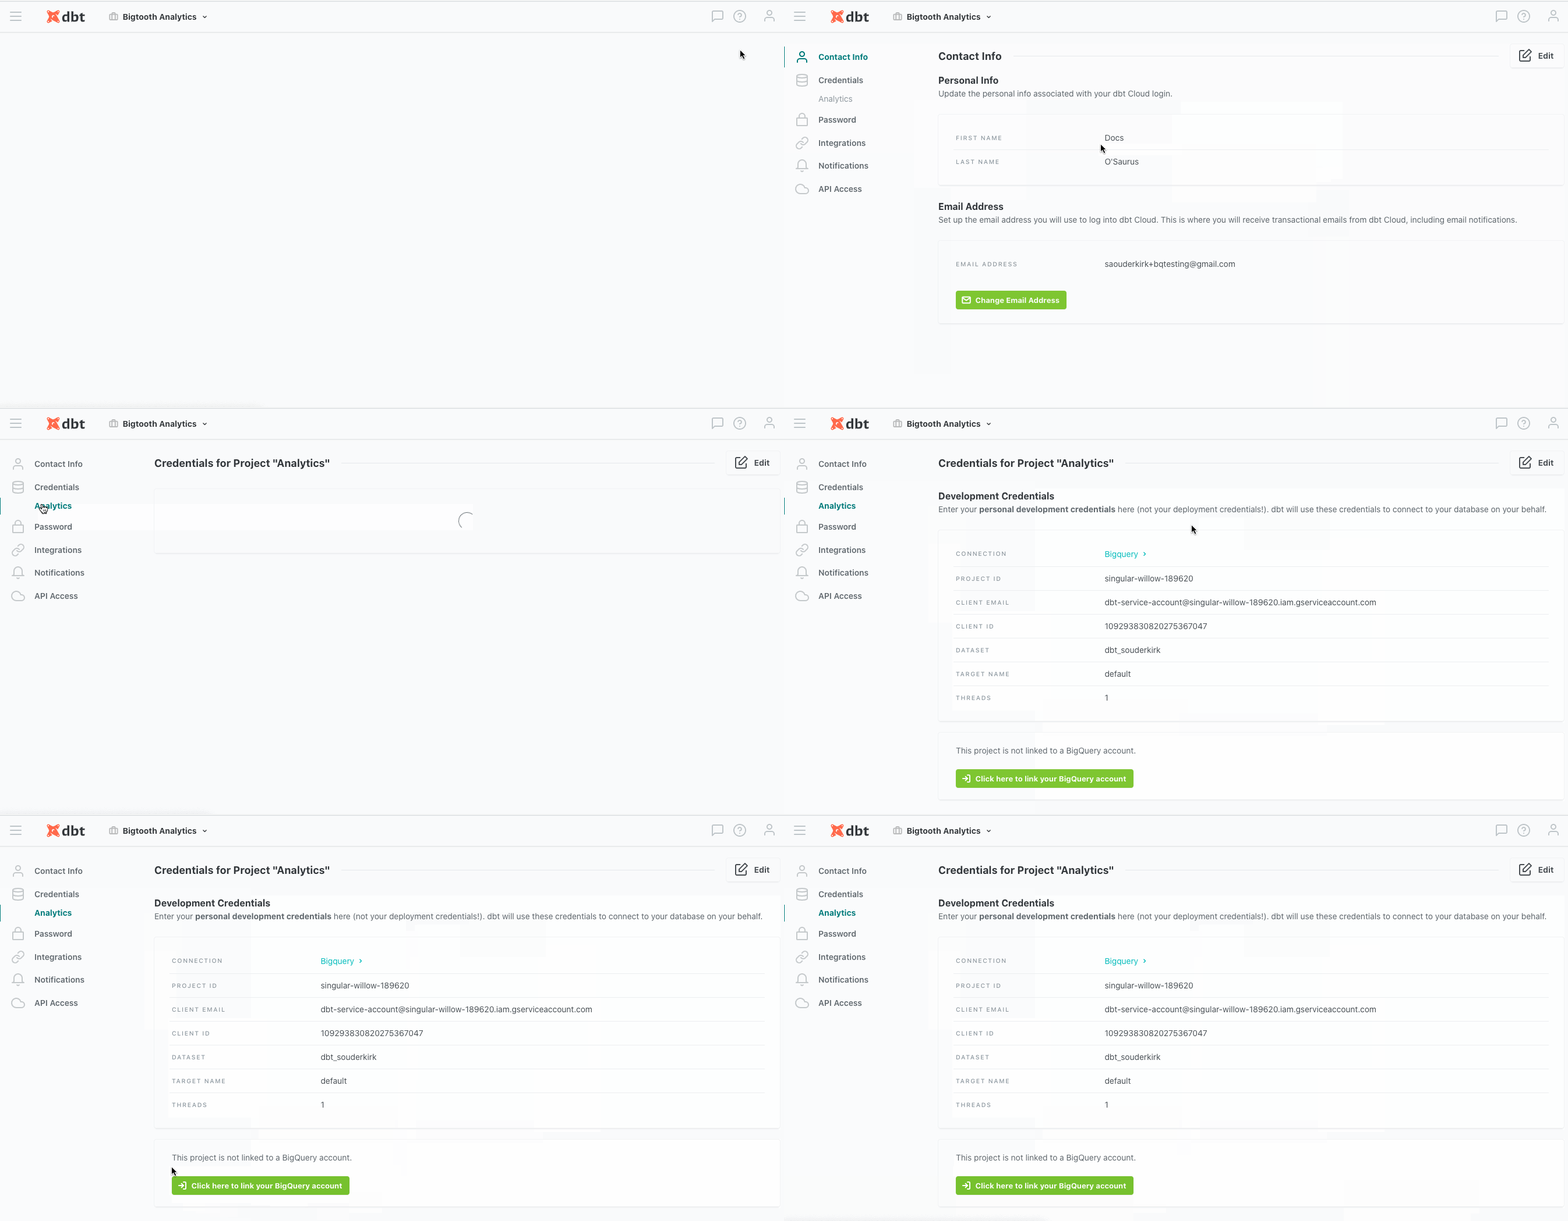
The OAuth auth method permits dbt Cloud to run development queries on behalf of a BigQuery user without the configuration of BigQuery service account keyfile in dbt Cloud. For more information on the initial configuration of a BigQuery OAuth connection in dbt Cloud, please see the docs on setting up BigQuery OAuth.
As an end user, if your organization has set up BigQuery OAuth, you can link a project with your personal BigQuery account in your personal Profile in dbt Cloud, like so:
Configuration
To learn how to optimize performance with data platform-specific configurations in dbt Cloud, refer to BigQuery-specific configuration.
Optional configurations
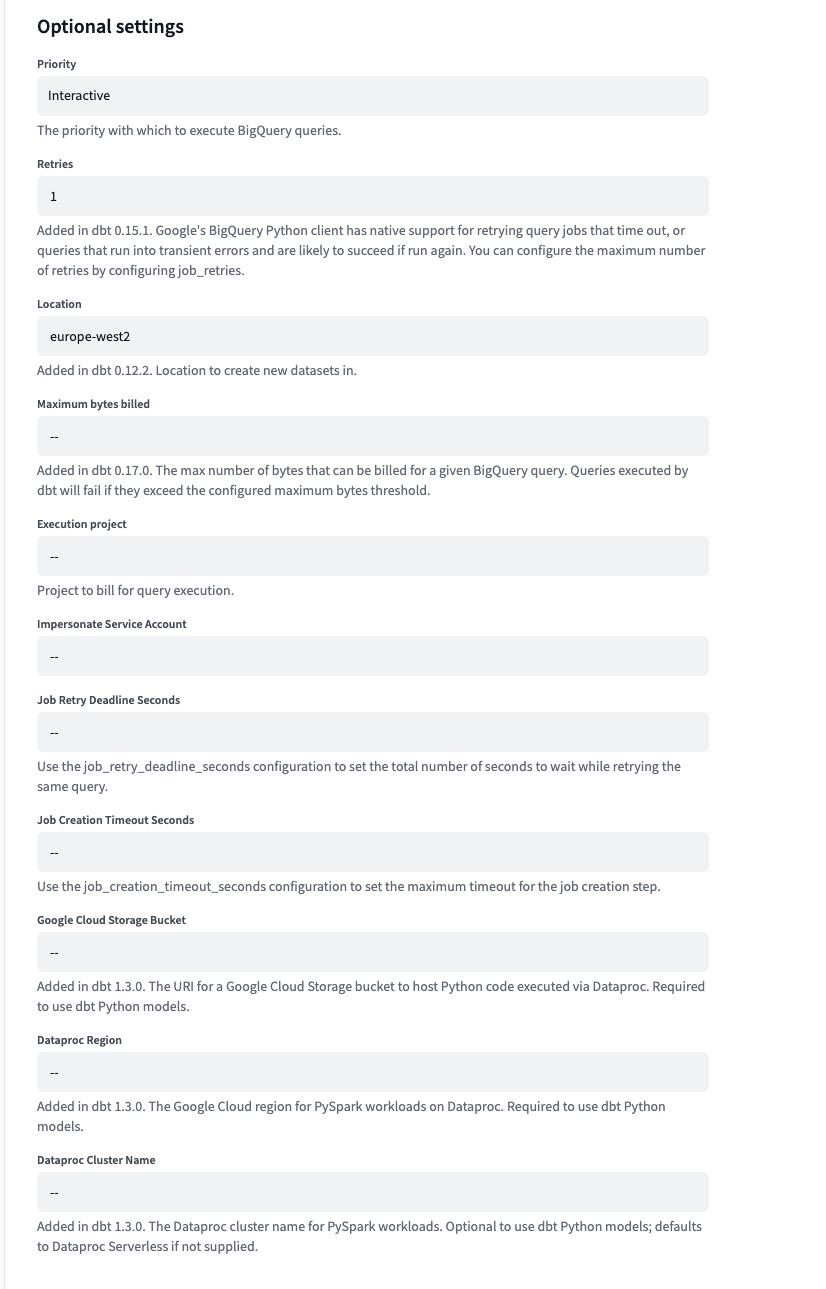
In BigQuery, optional configurations let you tailor settings for tasks such as query priority, dataset location, job timeout, and more. These options give you greater control over how BigQuery functions behind the scenes to meet your requirements.
To customize your optional configurations in dbt Cloud:
- Click your name at the bottom left-hand side bar menu in dbt Cloud
- Select Your profile from the menu
- From there, click Projects and select your BigQuery project
- Select your BigQuery project from the left-hand menu
- Go to Development Connection and select BigQuery
- Click Edit and then scroll down to Optional settings
The following are the optional configurations you can set in dbt Cloud:
| Configuration | Information | Type | Example |
|---|---|---|---|
| Priority | Sets the priority for BigQuery jobs (either immediate or queued for batch processing) | String | batch or interactive |
| Retries | Specifies the number of retries for failed jobs due to temporary issues | Integer | 3 |
| Location | Location for creating new datasets | String | US, EU, us-west2 |
| Maximum bytes billed | Limits the maximum number of bytes that can be billed for a query | Integer | 1000000000 |
| Execution project | Specifies the project ID to bill for query execution | String | my-project-id |
| Impersonate service account | Allows users authenticated locally to access BigQuery resources under a specified service account | String | service-account@project.iam.gserviceaccount.com |
| Job retry deadline seconds | Sets the total number of seconds BigQuery will attempt to retry a job if it fails | Integer | 600 |
| Job creation timeout seconds | Specifies the maximum timeout for the job creation step | Integer | 120 |
| Google cloud storage-bucket | Location for storing objects in Google Cloud Storage | String | my-bucket |
| Dataproc region | Specifies the cloud region for running data processing jobs | String | US, EU, asia-northeast1 |
| Dataproc cluster name | Assigns a unique identifier to a group of virtual machines in Dataproc | String | my-cluster |
Run dbt python models on Google Cloud Platform
To run dbt Python models on GCP, dbt uses companion services, Dataproc and Cloud Storage, that offer tight integrations with BigQuery. You may use an existing Dataproc cluster and Cloud Storage bucket, or create new ones:
- https://cloud.google.com/dataproc/docs/guides/create-cluster
- https://cloud.google.com/storage/docs/creating-buckets
Account level connections and credential management
You can re-use connections across multiple projects with global connections. Connections are attached at the environment level (formerly project level), so you can utilize multiple connections inside of a single project (to handle dev, staging, production, etc.).
BigQuery connections in dbt Cloud currently expect the credentials to be handled at the connection level (and only BigQuery connections). This was originally designed to facilitate creating a new connection by uploading a service account keyfile. This describes how to override credentials at the environment level, via extended attributes, to allow project administrators to manage credentials independently of the account level connection details used for that environment.
For a project, you will first create an environment variable to store the secret private_key value. Then, you will use extended attributes to override the entire service account JSON (you can't only override the secret key due to a constraint of extended attributes).
-
New environment variable
- Create a new secret environment variable to handle the private key:
DBT_ENV_SECRET_PROJECTXXX_PRIVATE_KEY - Fill in the private key value according the environment
To automate your deployment, use the following admin API request, with
XXXXXyour account number,YYYYYyour project number,ZZZZZyour API token:curl --request POST \
--url https://cloud.getdbt.com/api/v3/accounts/XXXXX/projects/YYYYY/environment-variables/bulk/ \
--header 'Accept: application/json' \
--header 'Authorization: Bearer ZZZZZ' \
--header 'Content-Type: application/json' \
--data '{
"env_var": [
{
"new_name": "DBT_ENV_SECRET_PROJECTXXX_PRIVATE_KEY",
"project": "Value by default for the entire project",
"ENVIRONMENT_NAME_1": "Optional, if wanted, value for environment name 1",
"ENVIRONMENT_NAME_2": "Optional, if wanted, value for environment name 2"
}
]
}' - Create a new secret environment variable to handle the private key:
-
Extended attributes
In the environment details, complete the extended attributes block with the following payload (replacing
XXXwith your corresponding information):keyfile_json:
type: service_account
project_id: xxx
private_key_id: xxx
private_key: '{{ env_var(''DBT_ENV_SECRET_PROJECTXXX_PRIVATE_KEY'') }}'
client_email: xxx
client_id: xxx
auth_uri: xxx
token_uri: xxx
auth_provider_x509_cert_url: xxx
client_x509_cert_url: xxxIf you require other fields to be overridden at the environment level via extended attributes, please respect the expected indentation (ordering doesn't matter):
priority: interactive
keyfile_json:
  type: xxx
  project_id: xxx
  private_key_id: xxx
  private_key: '{{ env_var(''DBT_ENV_SECRET_PROJECTXXX_PRIVATE_KEY'') }}'
  client_email: xxx
  client_id: xxx
  auth_uri: xxx
  token_uri: xxx
  auth_provider_x509_cert_url: xxx
  client_x509_cert_url: xxx
execution_project: buck-stops-here-456
To automate your deployment, you first need to create the extended attributes payload for a given project, and then assign it to a specific environment. With
XXXXXas your account number,YYYYYas your project number, andZZZZZas your API token:curl --request POST \
--url https://cloud.getdbt.com/api/v3/accounts/XXXXX/projects/YYYYY/extended-attributes/ \
--header 'Accept: application/json' \
--header 'Authorization: Bearer ZZZZZ' \
--header 'Content-Type: application/json' \
--data '{
"id": null,
"extended_attributes": {"type":"service_account","project_id":"xxx","private_key_id":"xxx","private_key":"{{ env_var('DBT_ENV_SECRET_PROJECTXXX_PRIVATE_KEY') }}","client_email":"xxx","client_id":xxx,"auth_uri":"https://accounts.google.com/o/oauth2/auth","token_uri":"https://oauth2.googleapis.com/token","auth_provider_x509_cert_url":"https://www.googleapis.com/oauth2/v1/certs","client_x509_cert_url":"xxx"},
"state": 1
}'Make a note of the
idreturned in the message. It will be used in the following call. WithEEEEEthe environment id,FFFFFthe extended attributes id:curl --request POST \
--url https://cloud.getdbt.com/api/v3/accounts/XXXXX/projects/YYYYY/environments/EEEEE/ \
--header 'Accept: application/json' \
--header 'Authorization: Bearer ZZZZZZ' \
--header 'Content-Type: application/json' \
--data '{
"extended_attributes_id": FFFFF
}'


